Exciting news!

13 Aug

Hello everyone!

I just wanted to mention that my life has been whirlwind-hectic over the past two weeks, hence the lack of posting. Very exciting things have happened, though!

My AmeriCorps contract ended August 1st. For all intents and purposes, I expected to spend a good amount of time post-AmeriCorps bumming about in Michigan, desperately looking for work (aka 4-5 hours a day of writing cover letters while sitting on my parents’ couch watching on-demand episodes of True Blood), or maybe full-time babysitting for my niece (aka writing cover letters in between feeding, changing, and reading to the squishiest, cutest little 9-month-old nugget I have ever seen).

And while I am slightly sad that I won’t get a little bit more time in Michigan, I am happy to report that neither of the above scenarios are going to happen: on my last day in Watsonville, I got a call from an organization in Chicago asking me to come in for an interview. So two days after I set foot in Michigan, I was boarding a train for Chicago. I spent an awesome 4 days there, had 2 job interviews, and am happy to report that I will now be employed at an amazing nonprofit in Chicago!

I start on the 22nd, so the next few days are going to be a chaotic adventure of trying to find a place to live and get my bearings in a city that has 100x the people that my last city did. It will be a major adjustment going from a sleepy west coast farming town with 40,000 people in it to the 3rd largest city in the USA, but I am ready for the challenge.

Unfortunately that means that this blog is going to be pretty sporadic until I get settled. For now, here’s another recipe from the cookbook: a simple, healthy homage to Watsonville and excellent Mexican food:

Vegetable Egg Tacos


Vegetable Egg Tacos:

3 whole eggs and 3 egg whites

1 onion, chopped

1 1/2 cups sliced mushrooms

3 roasted poblano or pasillo peppers, seeds removed (you can buy these already roasted, but I usually roast my own)

1 cup fresh spinach, chopped

8 corn tortillas


Cut the roasted peppers into strips. Set aside.

In a frying pan with maybe a teaspoon of oil, sauté the onions and mushrooms until the onions are translucent. Add the eggs and continue mixing until they are cooked through. Turn off the heat about 2 minutes before you think they’re done, they will continue to cook a bit.

If you have a gas stove, heat the tortillas by putting them, one at a time, directly over a medium flame. Use tongs to flip them, unless you’ve had a lot of practice. I started learning how to flip tortillas over open flame when I was a little girl, but that’s not to say I haven’t burned myself slightly once or twice. So be careful!

You can also heat the tortillas in a frying pan or steam them, but the above method is my preferred one.

Once you have one tortilla heated to the point where it’s flexible enough to roll, put some of that egg mixture, a few pepper strips, and some fresh spinach inside. Let the heat from the eggs wilt the spinach a teeny bit. This makes enough for 8 tacos, if you couldn’t figure that out by the fact that the recipe calls for 8 tortillas.

Notes:

If you want to roast your own peppers, it’s pretty easy:

Gas stove – simply place peppers directly over the flame of your stove, turning until all of the skin blisters and turns black. Don’t do this too long, though, or you’ll burn more than just the skin, you’ll burn the flesh inside as well. Let them cool, then just slide the blackened parts off of the pepper. Voila!

Electric stove – rub the skins of the peppers with a bit of oil, then place in broiler, turning to make sure all of the skin gets blistered and burnt. Again, careful to burn the skin and not the flesh inside – the oil really expedites this process, so keep an eye on your peppers – they shouldn’t take very long.

Vegan version – Instead of eggs, use some firm tofu mashed with a fork and maybe mixed with some paprika, turmeric and pepper.


Drumroll please……

29 Jul

Ladies and gentlemen….

It is finally here.

Healthy and Flavorful Home Cooking/El Sazón Para Cocinar Saludable


We are working on setting up some sort of paypal-type thing for anyone who doesn’t live in Santa Cruz County who might want a copy of the cookbook. 100% of the book’s proceeds go to feeding low-income families in the area.

This was a lot of hard work and I am so proud of this project.

And now, one from the book….

27 Jul

Three more days left at Second Harvest.

I’m starting to feel much more serene about leaving here, as I clean all my stuff out of my desk and clean up my computer files. I’m excited to see my family, and experience an actual autumn for the first time in two years….even if it means I have to first suffer through a stretch of this midwestern heat wave.

Either way, the countdown to the cookbook is almost over! Healthy and Flavorful Home Cooking/El Sazón para Cocinar Saludable might even get here TOMORROW. So here is an excerpt from the book:

Raspberry Zucchini Muffins

Raspberry Zucchini Muffins

2 cups whole wheat flour

¾ cup quick oats

1 tbsp baking powder

¼ tsp salt

¼ tsp nutmeg

3 tbsp sugar

4 tbsp canola oil

1 egg, lightly beaten

¾ cup skim milk

Zest from half of a lemon

1 tbsp lemon juice (about ½ a lemon worth)

1 cup shredded zucchini

12 oz fresh raspberries


Preheat oven to 350º. Grease muffin pans with nonstick cooking spray, or line with paper liners.

In a large bowl, sift together flour, oats, baking powder, salt and nutmeg.

In a separate bowl, combine sugar, oil, egg, milk, zest, and lemon juice. Blend using a whisk until uniform. Add in the zucchini and stir well.

Add the wet mixture to the bowl with the flour and stir until just mixed. Very gently fold in raspberries.

Bake for 25-30 minutes or until a toothpick inserted into a muffin comes out clean

Yields 18 muffins.

Note: These are MUFFINS, not cake. They are not particularly sweet, but they’re not supposed to be. Once upon a time, a muffin was not just an unfrosted cupcake. There’s only 3 tablespoons of added sugar in these…if you have a hankering for something sweeter, you could probably double or triple that. I wouldn’t judge you.

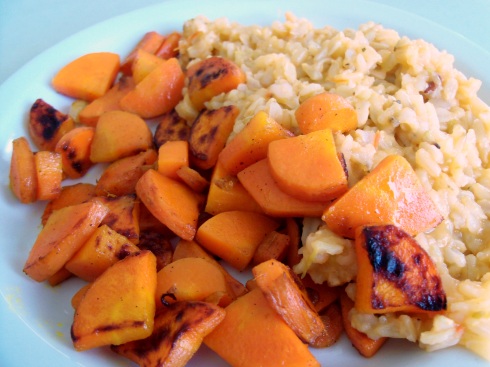
Sweet Carrots and Spicy Rice, or “Let the Countdown Begin….”

25 Jul

Today begins my last week at Second Harvest. I am definitely going out with a bang, though…I just got word today (about 5 minutes ago, if we’re being super accurate) that barring major catastrophe, my cookbook will be DONE, as in printed and bound and everything, by the end of the week. Just in time for the big Dedication Party that the food bank is throwing in honor of our building renovations finally being finished after years under construction.

That’s right, folks….I might be unemployed come next Tuesday, but I can officially call myself a published cookbook author. That’s a start, right?

If you can’t tell, I’m pretty excited about it.

And in honor of my last week, I’m going to do my best to cook every day this week.

Today’s recipe is semi-inspired by the emotional rollercoaster that is leaving somewhere that has been your home for 2 years – seemingly uncomplicated, but under the surface, far more complex.

Okay, perhaps that sounded a bit pretentious. It’s just carrots and rice. But really, really tasty carrots and rice.

Sweet Carrots and Spicy Rice

The juxtaposition of sweet and spicy in this recipe is what makes it interesting/complex. Carrots are  naturally high in sugar, and we definitely help it along by caramelizing them a bit with garlic and butter. They provide a nice relief to the super spiciness of the rice, made so by adding a scant 3 cups of my coworker Rosario’s homemade salsa. I don’t know how she makes it, but the basic standard I’ve learned in my two years here in Watsonville is something like the following:

2 whole, fresh Roma tomatoes

2-4 jalapeños or chiles of your choice, depending on how hot you want the salsa to be

2 cloves of garlic

about 1/2 of an onion

Salsa is pretty simple: just put all of that in a pot big enough to hold everything, enough water to just cover everything (difficult because the tomatoes tend to float) and boil until the skin of the tomatoes splits. Then throw everything in a food processor until it’s smooth. I often don’t boil the onion and add it fresh to the salsa.  I always include fresh cilantro as well, though I know that cilantro can be really polemic – some people love it, some people think it tastes like soap.

Either way, we had a big leftover jar of her salsa from the AmeriCorps going-away breakfast. I’m guessing hers had at least 3 serrano chiles in it, because it was really spicy. One of my trade secrets is that the easiest way to make “Mexican Rice” (in a fairly non-authentic way, since the “real” Mexican Rice is pretty much ALWAYS made with chicken stock) is to add this salsa to cooking brown rice, substituting about 1/3 of the water you would normally use for salsa.

Note: the kind of salsa you buy in a jar in your local supermarket functions fine, but the homemade stuff works much better. None of that “tomato paste” taste to it.

So, to get to the actual recipe:

Sweet Carrots and Spicy Rice

For the rice:

1 (1 lb.) bag of brown rice

3 scant cups of salsa

6 cups of water

1 tsp butter (or vegan butter if you so choose)

couple shakes of dried oregano

Fairly simple: put everything in a pot that has a lid. Bring it up to boil, cover, then reduce heat to medium-low and simmer for about 45 minutes. Try not to lift the lid, unless you smell something burning. Then you definitely want to make sure that everything’s doing okay in there. You can make the carrots while your rice is cooking!

After 45 minutes, turn off the heat and let the rice sit for about 5-10 minutes.

For the carrots:

8 large carrots, quartered and sliced

3 cloves garlic

1 tbsp butter (or vegan butter if you so choose)

1 tsp brown sugar

couple shakes of cinnamon

In a large skillet, heat the butter over medium. Add the garlic and sauté 2 or 3 minutes, stirring constantly. Add the carrots and increase heat to medium-high. Sauté about 20 minutes, stirring often, until carrots start to soften (hey, that rhymed!). Add the sugar and cinnamon, and sauté about 5 minutes longer. Remove from heat.

This served at least 6 people.

What a week!

22 Jul

No, really. This week has been insane.

Not in a “my job is so hectic!” sort of way, but in a “no tears, Ryanne” sort of of way.

Let me explain:

I have been working at Second Harvest for the past two years through the AmeriCorps program. For anyone unfamiliar, AmeriCorps is an amazing program that sends volunteers to needy communities to pledge a full year of community service – 1700 hours worth, which averages as a full-time job. I started my first year of AmeriCorps in September of 2009, and fell in love with the mission of Second Harvest and the community that I was serving so much that I signed up for a second year.

Well that year is coming to a close on August 1st, and since there is a 2-year limit on being in AmeriCorps in the same position, my time at Second Harvest is coming to a close. At this point it looks like I’ll be heading back to Michigan, so this last week and the one that’s coming have been/are going to be filled with goodbyes.

I said goodbye to 3 of my 5 classes, and will say goodbye to the other two next week. One of them even threw me a little “party” complete with balloons and a cake. I may or may not have teared up at reading the card that all of my volunteers signed.

And today, the staff of Second Harvest threw me and the other two AmeriCorps members who work there a surprise ‘thank you for all your hard work’ breakfast. I may or may not have teared up hearing my own supervisor, the Director of Programs (my boss’ boss), the CEO of Second Harvest (my boss’ boss’ boss), and even a handful of people I don’t work with directly giving genuine appreciation for the work we’ve done during our contracts.

All of these goodbyes have been incredibly bittersweet. I have fallen deeply in love with the work that I do here and the community that I serve, and it makes me sad to leave it behind.

But, since food is supposed to be a happy thing, this week’s recipe is focusing on a happier moment:

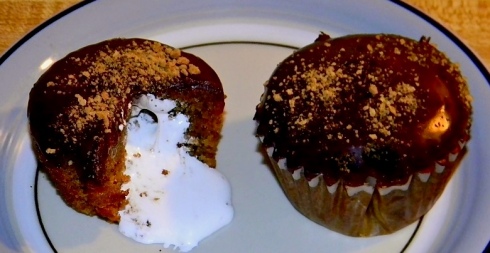
Last Saturday was my good friend’s birthday! And anyone who knows me, knows that birthdays mean cupcakes. Ridiculously elaborate cupcakes. And her birthday was no exception.

She requested s’mores cupcakes from me, and I happily obliged. I tried my hardest to make these vegan, but I hit a snag with the marshmallow part. My original plan was graham cracker cake with vegan marshmallows baked into the center, finished with a chocolate ganache and more graham cracker crumbs.

Everything seemed to be going well, until I cut an unfrosted cupcake in half to check out how the marshmallows did in the oven. Unfortunately they completely disappeared, leaving behind a sticky cavern in the middle of my cupcake!

This being completely unacceptable, I thought of ways to fix it. Piping in vanilla buttercream frosting was my first idea, and if you wanted to keep these cupcakes vegan, would be my best recommendation.

Admittedly, I got a little lazy (I’m not a fan of making buttercream) and had my heart set on a true marshmallow-y feel to them, so instead I just went out and bought a jar of marshmallow creme. As far as I know, a vegan version of marshmallow creme does not exist, but please correct me if I’m wrong.

So I piped marshmallow creme into the center of the cupcakes. Since it is so sticky and much thicker than frosting, this requires quite a bit of patience (and hand strength). But it worked great!

I finished them off with the chocolate ganache, and they were a huge hit.

A thanks to my friend Jason for taking the photos:

S'mores cupcakes

S’mores cupcakes (adapted from Vegan Cupcakes Take Over the World )

For the cupcakes:

1 cup flour

1 tsp baking powder

1/2 tsp baking soda

1/2 tsp salt

1 tbsp cinnamon

3/4 cup graham cracker crumbs

3/4 cup brown sugar

1/2 cup oil

1 tbsp vanilla

1 tbsp molasses (if you only have blackstrap molasses, use a tsp)

1 1/4 cup milk of your choice (I used hemp milk)

12-24 mini vegan marshmallows (or nonvegan ones if you choose)

Get two bowls handy, preheat your oven to 350º and line a cupcake tin with paper liners.

In the smaller bowl, whisk together the flour, baking soda, baking powder, salt, and cinnamon until everything looks uniform. Then add in the graham cracker crumbs, and mix everything again.

In the larger bowl, whisk together the brown sugar, oil, vanilla, and molasses. When this is uniform, add in the milk and whisk again.

Add the bowl of dry stuff to the bowl of wet stuff in two batches, making sure that everything is mixed uniformly.

Now, I used a 2-tbsp coffee scoop to put 2 tbsp’s worth of cake batter into each cupcake liner. Then I put 1 or 2 mini marshmallows in each one, then filled the liner with more batter, till about 3/4 of the way full. It’s important not to fill a cupcake liner alllll the way to the top, because exploding cupcakes are never that pretty, and don’t bake so evenly. I had batter left over, which I poured into a ramekin and baked as a separate baby cake.

Bake these little guys for about 20 minutes. Some of the mini marshmallows will rise to the top of the batter and sort of explode out of the top of the cake – save those ones for those people who enjoy burning their marshmallows. They’ll appreciate them.

Now, as I mentioned before, the marshmallows are pretty much going to disappear into the cake as they cool. This is okay though! The hole they leave behind will give you a great space to pipe in marshmallow creme or buttercream.

While your cupcakes are cooling, fill a piping bag (with a long, round decorating tip if you’ve got one) or a large plastic storage bag with marshmallow creme. A small jar will be plenty for this. This is an incredibly messy, sticky step, so try to get the whole jar into the bag if you can manage that.

If you want, let the creme warm up a little bit, as this will make it easier to pipe.

Once your cupcakes are COMPLETELY cool, pipe that in there. If you have a decorating tip, it’s pretty straightforward, except like I said before, it takes more patience and hand strength since the creme is so thick.

If you don’t have piping tips (I’m aware that not everyone is as big of a baking nerd as I am) use your pinky to poke a hole in the top of each cupcake, and cut a hole in the corner of your large plastic storage bag.

Once your are done piping, it’s time to make the chocolate ganache.

Don’t let the fancy  name fool you – ganache is WAY easier to make than buttercream…which is probably why I’ve been using it so much lately.

For the chocolate ganache:

About 1 to 1 1/2 cups chocolate chips

3 tbsp milk or creamer of your choice

In a small saucepan, heat up the milk until it is steaming, but not boiling. Remove it from heat.

Add in the chocolate chips and stir constantly until you get a shiny, uniform and drizzle-able liquid.

Yep, that’s it. You now have ganache. Pretty simple, right?

So finish by dipping each of your cupcakes into the ganache, then sprinkling a bit more graham cracker crumbs on top.

According to Megan(the birthday girl), these even tasted good 2 days later when she may or may not have had one for breakfast.

Happy Birthday, Darlin’.

Oh hello again!

14 Jul

A million apologies for the fact that I haven’t updated in forever. I have been very busy:

Last weekend I was camping/hiking in Yosemite. Twenty miles of hiking over two days left me pretty exhausted, but aside from the awful blisters and at least 2 dozen mosquito bites, the weekend was perfect. I love California.

And this past weekend my mom and aunt came to visit me, so I’ve been eating at restaurants and not cooking for the past 5 days. San Francisco is an amazing food city – but 5 days of Peruvian arroz criollo, margherita pizza, barbequed brisket and salmon burgers has left me eager to cook and yearning for vegetables.

Minor aside: Can I mention how ridiculous restaurant portions are? After the first day of traveling, my mother and I decided to split every meal and even only eating half of an entree, I never left a restaurant hungry.

Either way, yesterday was my first day back at the Food Bank. Again, I was eager to cook and glad to be back in the land of vegetables. It was an especially great day so far as produce goes: we had a big bag of bok choy from someone’s garden, and some beautiful asparagus, so I decided to make a stir fry.

If I’m not mistaken, this recipe is gluten free. It is most definitely vegan.

So without further ado, here’s the recipe from yesterday’s volunteer meal:

Asparagus and Bok Choy Stir Fry

Asparagus and Bok Choy Stir Fry

(Note: If you are unfamiliar with Bok Choy, there is a link in the comments to a picture and information on the vegetable)

2 tbsp oil

1 lb asparagus, chopped into 1.5 inch pieces (make sure to discard any ends that are too woodsy)

1 lb bok choy – separate the greens from the white stalks. Give each a rough chop – uniformity isn’t important here.

1 onion, diced or sliced into tiny crescents

about 1/2 cup Bragg’s Liquid Aminos(you could use soy sauce here, but Bragg’s is gluten free and not so salty)

1/2 cup corn

2 cloves garlic

1 tbsp ginger

1 tbsp mustard powder

red chili flakes to taste

about 3 tbsp brown sugar

1 tsp corn starch

2 tbsp water

3 cups water

1.5 cups dry rice of your choosing

Make the rice according to the directions on the package. If you have a rice cooker, even better. I used white rice because that’s what we happened to have at the food bank, but truth be told I prefer brown rice. Not only is it way better for you, I like the chewier texture and better flavor. White rice gets mushy so easily.

Use a wok if you have one, but a large skillet will work here too.

Heat oil over medium, and add the onions. When they’re translucent, add the stalks of the bok choy. Let sauté about 5 minutes. The stalks will release a lot of liquid.

When they’re all liquidy (I think that’s the technical term), add the Bragg’s, garlic, ginger, and mustard powder. Let simmer about 5 minutes, stirring often, then add the asparagus, the chopped greens of the bok choy, and the corn. When the asparagus is bright green, add the brown sugar and stir well.

In a separate little container, such as a juice glass or ramekin, mix the corn starch and water together. This is called a slurry, and it’s really useful to thicken up sauces. Mixing the corn starch with water ensures that there won’t be any lumps in the final product. Be careful with slurries, though – too much cornstarch and your sauce will turn to jelly. A little bit goes a long way.

Once your sauce is thickened up, add red chili flakes to taste. Toss the cooked rice in with the vegetables and serve hot.

This made enough to generously feed at least 6 people.

The “idea” of summer, Watsonville’s “migrant” farmworkers, and a “cornbread” recipe

28 Jun

This is my second summer in California. I grew up in Michigan, and if there is one thing that I am definitely still getting used to, it is the idea of “seasons” here on the central coast. Or more accurately, the lack thereof.

One would think that a summer in California would be far warmer than a summer in Michigan, but one would be sorely mistaken. Remember, I live on the central coast, not in southern California, and my first summer here was the absolute coldest, cloudiest, most non-summery summer I have every experienced. In Michigan summer means hot, sticky, and humid –  that oppressive heat that makes it hard to move and that assures that you’ll be a sweaty mess no less than 5 minutes after leaving the shower or leaving your house, depending on whether or not your place is air-conditioned.

Here, summer is more of an “idea.” Since the weather doesn’t change much, there’s no major qualitative difference between January and July, save perhaps the number of rainy days, the percentage of Santa Cruz that is made up of tourists, and how many people in Watsonville are actually working. More on that:

Watsonville is known as a berry capital, and summer is peak harvesting season. That means a good portion of the food-insecure population here is working very long days picking strawberries, raspberries, and blackberries. Due to the utter lack of weather changes, the berry growing season can be as long as 10 months in a good year. For that reason, talking about the “migrant farm workers”  is a bit of a misnomer; for most of them, Watsonville is home year-round. It keeps us very busy in the winter, when work is scarce (if existent at all), but it also means that we slow down quite a bit in the summer, due to the instant surge in gainful employment, as paltry as those gains might be. For many farm workers, their summer employment doesn’t mean that they no longer need the support of the food bank, it means that their 14 hour work day prevents them from coming to pick up food. The fact that the people responsible for getting fresh produce to the rest of the nation, the ones harvesting our food, are not paid enough to be able to purchase it themselves is an infuriating flaw in our food system. And while perhaps the food bank is merely a stop-gap measure in fixing it, I am glad to help in whatever way I can.

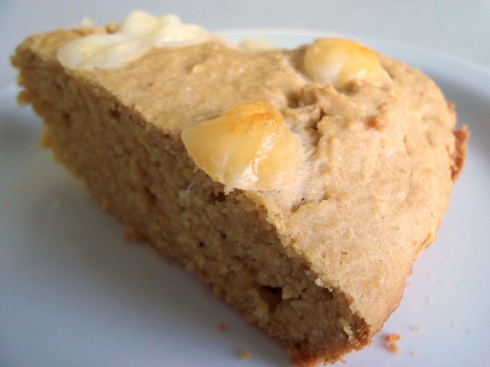
Anyway, this is a very slow week for my department at the food bank. There are no classes, no Food for Children distributions, and Agency shopping is closed for inventory. Because of that, we only have a few volunteers working this week, and since I had some extra time on my hands I decided to bake some cornbread for them. Also, because baking is my favorite thing in the world.

Instead of regular cornmeal, I used masa harina, which is the extra fine corn flour used in Mexican cooking to make corn tortillas, tamales, etc. It gives cornbread less of a gritty texture, but with all of the same flavor. I also used whole wheat flour, but of the white berry variety. Honestly, white berry whole wheat flour is like a secret weapon – it is less dense and gritty than the red berry variety, thus avoiding that super dense, chewy, “healthy” feel that whole wheat baking sometimes has.

I also sprinkled the top with slices of string cheese (once again, one of those “use what you have because you work at a food bank” sort of things). I expected it to melt and spread out, but turns out baking string cheese stays in perfectly round circles, resulting in a polka-dotted baked good. Either way, it tasted good.

Cornbread

Whole Grain Cornbread Recipe

1 cup whole wheat white berry flour

1 cup masa harina

1/2 tsp baking powder

1/2 tsp baking soda

1 tsp salt

2 eggs (vegan version: use flax eggs – 1 tablespoon ground flax seeds and 3 tablespoons water for each egg being replaced)

1/4 cup oil

1 cup soy milk

1 string-cheese stick, sliced into 1/4 inch discs (easily omitted for vegan version, though a vegan cheese would work here too)

Preheat your oven to 375º. Grease a pie pan with butter or nonstick cooking spray.

In a large bowl, mix together the flour, masa harina, baking powder, baking soda, and salt.

In a separate bowl, mix together the eggs, oil, and soy milk.

Add the wet ingredient mixture to the dry ingredient mixture and mix well.

Pour the batter into your prepared pie pan and bake about 30 minutes, or until a toothpick inserted into the center comes out clean.

This yields anywhere from 6-12 servings depending on how big you want your portions to be.

Profile view

Hectic Days and Easy Dinners

24 Jun

Wednesday was hectic. I had to prepare a meal for the volunteers, help with a bread and produce distribution at La Manzana (a resource center in Watsonville), work on edits for my cookbook, figure out what I was going to prepare for my class based on what produce they would be getting, write up a bilingual recipe card for my cooking class, then load up the portable kitchen and go teach. Recipe classes are a lot of fun, and this one was especially easy – we’ve been talking about sugar, so we made smoothies! Not that smoothie making is all that complicated, but this combination was delicious:

  • raw spinach
  • frozen bananas
  • strawberries
  • watermelon chunks
  • orange chunks
  • water

I was talking to one of the professional chefs that volunteer with our cooking class, an amazing woman named Beth, and she brought up the very good point that it is absolutely unnecessary to add juice to smoothies, since so much fruit is already going into it. And picking fruit like watermelon and whole orange junks means all the juice you could need, but without getting rid of all that fiber-y goodness found in whole fruits. The smoothies were a big hit, but by the time cleanup happened, the van was returned to the food bank, and I walked home, I was exhausted. It was hot in my house and since I’d been making food all day, the last thing I wanted was a complicated dinner. Enter: The salad!

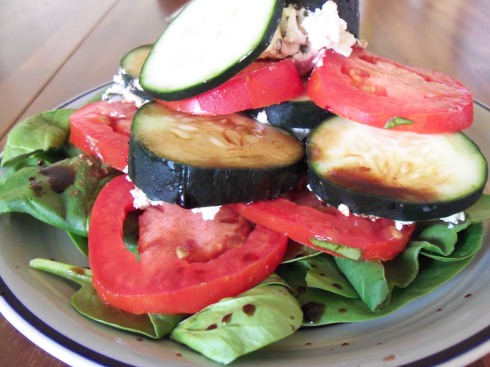
I swear, salads are amazing for the fact that you can layer sliced/chopped vegetables, pour dressing over them, and have a meal. This one was particularly simple, though looks deceptively fancy. The raw garlic could be a little intense if you don’t really, really love garlic (I do), so this would be a great time to use roasted garlic if you are the type of person to have a collection of roasted garlic on hand. I am not that guy.

This is a single portion salad, but easily tripled or quadrupled or however many times you need to multiply to make it for your usual dinner crowd.

Spinach Salad with Roma Tomato, Cucumber, and Basil Goat Cheese

Spinach Salad with Roma Tomato, Cucumber, and Basil Goat Cheese

1 generous handful of raw baby spinach

1 roma tomato

1/2 of 1 Cucumber

About 2 oz. of goat cheese

2 sprigs of fresh basil

1/2 clove raw garlic

pinch of sea salt

about 1 tbsp balsamic vinegar

Wash all your veggies and lay out baby spinach on a plate.

With a serrated knife, cut the roma tomato into 1/2 inch slices, then arrange them on top of the spinach.

Cut the cucumber into 1/2 inch slices as well.

Mince the garlic and grind with sea salt.

Cut the fresh basil into tiny pieces.

In a small bowl, mix the garlic, salt, basil, and goat cheese until everything is uniformly distributed.

Spread the cheese mixture on the cucumber slices, and layer them over the tomatoes. More than one tomato-cheese-cucumber layer would be perfectly acceptable here.

Drizzle the whole thing with balsamic vinegar.

Enjoy!

Vegan versions: Goat cheese has a sort of grassy flavor that tofu definitely doesn’t, and a store-bought vegan cheese would definitely NOT do this recipe justice. I think your best bet for something similar would be a nut-cheese, like cashew. There used to be this amazing raw food place in my college neighborhood that made the most amazing nut cheeses, but alas it has since closed. Alas, I have never made a nut cheese before. Hopefully this weekend I can tackle that and write about it!

My First Gratin and being a part-time caterer

17 Jun

Once a month we have an all-staff meeting, bright and early at 7:30 am. To help keep morale up, breakfast is provided….by me. When you combine the eternal nonprofit struggle to save money with my reputation around the office as a good cook, you inevitably end up with me being appointed caterer at events, meetings, etc. Generally I don’t mind, and I have an amazing “sous chef” by way of Megan, the other nutrition programs assistant who helps me with chopping and has an amazing ability to put up with my freak outs and erratic bouts of kitchen temper.

I tend to stress myself out quite a bit with these breakfasts, but I’ve learned that generally everyone is just has happy to get yogurt parfaits that take all of 20 minutes to assemble as they are to get a 4-vegetable strata that took me 3 hours. But hey, I like a challenge!

This morning’s breakfast was one of my fancier ones and went over even better than I’d imagined. I was craving something of the comfort food variety yesterday (and we had a 2 lb block of cheese that needed using) so I got it in my head to make a gratin. Well truthfully, I wanted to make macaroni and cheese, but consensus around the office was that macaroni and cheese was not an appropriate breakfast food. I maintain my dissent in that decision, but agreed to make a gratin instead.

I had never made a gratin before, and thus was slightly nervous about it. The basis of gratin is bechamel, a sauce that’s fairly easy and incredibly versatile once you get the hang of making it. It can become gratin, gravy, alfredo, you name it. Honestly, mastering roux and bechamel is a major asset for any aspiring cook.

I couldn’t help but add extra vegetables, both for color/texture purposes and because we had mushrooms and spinach. We also boiled the potatoes for a bit before slicing them, which cut down on baking time by about an hour – TOTALLY worth it. I am very happy with how it turned out.

Potato Gratin with Mushrooms, Spinach, and Caramelized Onions

(Note: it is not that the potatoes are very large, it’s that the plate is very tiny)

Potato Gratin with Mushrooms, Spinach and Caramelized Onion

This recipe fed about 20 people, so feel free to halve or quarter it.

4-ish lbs of new potatoes, scrubbed and cut in half

2 lbs cremini mushrooms, sliced

1 red onion, sliced into half circles

about 1/3 cup of butter (less if you use nonstick cooking spray for the casserole dish)

2 cups baby spinach

3 heaping tablespoons whole wheat flour

1-2 cups milk (I used skim, there’s plenty of fat in this recipe already)

Couple shakes of basil, oregano, and cayenne pepper.

2 lbs of shredded or crumbled cheese – I used a reduced-fat American (another “use what you have” because you work at a food bank thing), but cheddar would work great here, too

To start, butter a large casserole dish, or use nonstick cooking spray. Preheat your oven to 400º.

Fill a stock pot with potatoes and enough water to cover them. Bring the pot up to boil, cover it, and boil until the potatoes are easily pierced with a fork. Drain, and set aside to cool.

Sauté the mushrooms in about a tablespoon of butter until they’ve sweat out their liquid. Remove them from that liquid, but save it! I used it in the bechamel and it gave it a great flavor.

In a separate pan, sauté the onions in another tablespoon of butter over medium-high heat until they get a nice sear on them.

Now that your potatoes are cool enough to handle, slice them about 1/2 an inch thick. In your casserole dish, layer as follows, starting at the bottom:

  • Mushrooms
  • Potatoes
  • Mushrooms
  • Potatoes
  • Spinach
  • Potatoes

Now it’s time to make the sauce! If you’re not familiar with cream sauces, this is the basic way that most of them are made. First, you make a roux:

Start by melting about 3 tablespoons of butter in a saucepan over medium heat. Make sure that you’re starting with a saucepan large enough to hold whatever quantity of sauce you plan to make. When the butter is melted, add 3 tablespoons of flour. I used whole wheat flour, but if you’re planning on making a sauce that you’d like to stay white, be warned that whole wheat flour will leave little brown flecks. Let the flour cook in the butter, stirring often to keep it from burning. It is very easy to tell when the flour is done with white flour – you want it to be the color of caramel. With whole wheat flour this is a little trickier, since the flour is already dark. Just pay attention: when the flour is about 2 or 3 shades darker than it was in the beginning, it’s good!

Now remember all that mushroom juice you saved? Add it to the pot, stirring to incorporate it into the cooked flour. Turn the heat down to low, add the milk, and stir until everything is uniform and lump-free. If it seems too thick, add a bit of water or milk. It should be creamy, but thin enough to be pourable. Add in cayenne, oregano, and basil to taste. While stirring constantly and remembering to scrape down the sides of the saucepan, add about 2 cups of cheese to the bechamel. Once it is melted, carefully ladle the sauce over your vegetables, trying to make sure everything stays evenly coated. Sprinkle the top with more cheese.

Finish with the caramelized onions. Then pop the whole thing in the oven about 20 minutes, or until the edges are bubbly.

Let it sit about 10 minutes before serving.

Once again: this was enough to feed at least 20 people, so feel free to cut down on all the quantities.

Vegan options: One could easily use vegan versions of milk and butter. I’m not a huge fan of vegan cheese, but if you are, go ahead and cover it with whichever kind you like. If you’d rather opt out of vegan cheese, just add about a tablespoon of mustard powder and about 1/2 a cup of nutritional yeast to the bechamel to give it a “cheesy” flavor, and maybe increase the amount of basil and oregano.

Today’s Food Bank Adventure

15 Jun

Have you ever seen that show on The Food Network called Chopped?

The one where 4 cooks are given some random assortment of odd ingredients that they have to turn into a cohesive meal, one cook being eliminated after each course based on how well they do?

That show is what working at a food bank is like every day, minus the part where I get $10,000 if I make it all the way to the end. My ingredient list is entirely at the mercy of outside factors: what gets donated, what’s in season, what is in surplus nationally, etc. Sometimes I get lucky and I’m working with a dozen different fruits and vegetables that I can pick and choose from, sometimes we have nothing but potatoes and lettuce. Don’t get me wrong, I’m not complaining. The challenge is actually one of my favorite parts of the job. It assures that my days here are always, and I mean ALWAYS an adventure.

Today was a better day, so far as options go: we had fresh spinach, cremini mushrooms, and someone donated some fresh herbs from their garden. The personal garden donations are always my favorite; how touching that there are gardeners out there, taking the time to personally grow food that they are sharing with their community?

Anyway, I decided to make a pesto with the herbs, since we also had some leftover fettuccine pasta. This whole recipe came together in about 45 minutes, though I did have help with the chopping.

Pesto Fettuccine with Mushrooms

Pesto Fettuccine with Mushrooms

For the pasta dish:

1 (12 oz) package fettuccine, preferably whole wheat

1 tbsp olive oil

1 red onion, sliced into thin crescents or half-circles

3 cups cremini mushrooms, sliced

For the pesto:

4 cups fresh spinach, larger leaves chopped

1 cup fresh parsley

4 green onions, roughly chopped

2-3 cloves garlic

Sprig of fresh rosemary, stem removed

Sprig of fresh thyme, stem removed

¼ cup fresh basil

¼ cup olive oil

½ cup nuts of your choice, chopped

¼ cup parmesan cheese (completely optional)

½- 1 cup water

Optional: cayenne pepper and/or paprika for garnish (I mostly add this to break up the whole “pile of green goo” that pesto can sometimes look like. Arguably, this just makes it a “pile of green goo with red sprinkles,” but somehow that’s better to me.)

Cook pasta according to directions on package. Probably a good idea to err on the side of ‘al dente’ since the pasta will be sautéed later.

In a large skillet, heat the olive oil over medium-high heat. Add the onion and sauté a few minutes, stirring frequently, until the onions are slightly browned. Add the sliced mushrooms and reduce heat to medium. Continue to sauté until the mushrooms have released their liquid, about 7-10 minutes. Remove from heat.

In a blender or food processor, add 3 cups of the spinach along with the rest of the pesto ingredients, starting with ½ cup of water and adding more as necessary. Reserve one cup of the spinach to add whole to the final dish. Blend until smooth. Since the pesto will get sautéed with the pasta, it is okay if it seems a bit watery – the heat will thicken it up a bit.

Once the pesto is smooth, add it along with the pasta to the pan with the mushrooms and onions. Add reserved cup of spinach. Heat over low or medium-low heat, stirring until everything is well-coated and spinach is wilted. Once plated, sprinkle dish with cayenne pepper if you would like something slightly spicy, or paprika if not.

I’d say this makes 4-6 servings.